Finishing the Cajon.
Now that the final element of the cajon has arrived we can finish its assembly. Was waiting on the steel drum share which is important for the sound of the instrument.


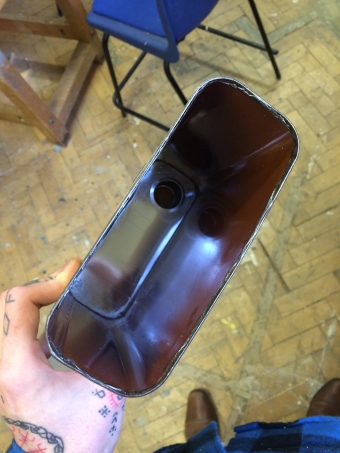
As you and see inside of the instrument that wooden broomstick comes back into play as its what we need to attach the snare to so it can be pushed up against the inside of the front panel.

A look through the sound hole (not official name) will show you the setup. As you hit the front of the cajon the snare will reverberate inside and create the drum layered sound.


It’s a project about community after all.
Now that the cajon assembly is finished and it sounds just as its suppose to. we tern our precious new instrument over to fellow students. we are living it in the year two hallway with paints, paint brushes and a nice sign asking to paint the cajon.
We don’t just want people to be involved at the performance time but along the way as well we have already got access to a community of artists why not take advantage of that.


Experimenting with materials and makeup.
Racheal started to experiment this makeup and ambient props for the performance mainly with something called Lit a heat and light absorbing paint that will then after absorbing this heat glow in the dark or if its a lot then even glow during the day.
This will be great for say painting runes, faces or other objects to give them the mystic of being magical.
examples below.

Racheal’s face painting examples.


The next instrument.
Now that the cajon is out of our hands for some time we might as well move onto the next instrument.
looking into string instruments like guitars and ukuleles I found a video of people making such instruments out of cheap materials like oil cans and wood and considering I have access to the wood workshop why not give it a try myself.
Bottom left is the neck and head of the ukulele nothing super technical about it creation just cut and sanded wood however there is some easy engineering that I came up with when trying to make a way to tune the ukulele once its all together.
That would be the nuts of the head drilling four holes into the head and sanding down some old paintbrushes so they tightly fit into those holes. now drilling really small holes into those paintbrushes for you to thread the strings through. finally flatten off the ends of the newly made nuts so you can grip and twist them and in turn tune your instrument.


The white and orange elf oil can is one I found on ebay because every location that might have had one (workshop, scrap places, kebab shops) didn’t have any so internet to the rescue.
Needed some cleaning up before working on it.


Bit of health and safety notes at this point. when cutting metal wear eye and hand protection and use a metal cutting shears. (and metal drill bits.


At the top left you can see a small square hole in the top of the oil can that’s where the internals will connect to the neck.


Need to get access to the inside and file down the sharp parts.

More wood for the internals of the ukulele which connect to the neck.


How the internals slot inside.


